Working with a cramped bathroom doesn’t mean sacrificing function or style. Whether you’re dealing with a powder room under the stairs or a narrow full bath carved out of a vintage home, smart design choices can turn even the tightest footprint into something surprisingly usable. The trick isn’t to wish for more square footage, it’s to make every inch count through thoughtful fixture selection, visual expansion techniques, and storage that doesn’t eat up floor space. This guide walks through proven strategies that balance practical upgrades with budget-conscious design moves.
Table of Contents
ToggleKey Takeaways
- Small bathroom design succeeds by maximizing every inch through smart fixture selection, visual expansion techniques, and strategic storage rather than wishing for more square footage.
- Wall-mounted vanities and floating shelves create the illusion of a larger space by exposing floor area and are essential to modern small bathroom design.
- Light paint colors, layered lighting (ceiling cans, sconces, LED strips), and mirrors that reflect natural light visually expand cramped bathrooms without costly renovations.
- Space-saving fixtures like compact 18-inch vanities, wall-hung toilets, and sliding shower doors eliminate clutter and improve traffic flow in tight quarters.
- Large-format tiles and monochromatic color schemes minimize visual breaks and grout lines, making small bathrooms feel more continuous and spacious.
- Budget-conscious small bathroom updates include refreshing existing vanities with paint and new hardware, reglazing tubs, and sourcing discounted fixtures from resale stores or online marketplaces.
Understanding Your Small Bathroom Layout Options
Before selecting fixtures or tile, map out what layout works within your existing footprint. Small bathrooms typically fall into three common configurations: the three-quarter bath (toilet, sink, shower), the half bath (toilet and sink), and the full bath (toilet, sink, tub/shower combo). Each demands a different approach.
Measure your space carefully, use actual dimensions, not estimates. A typical toilet needs a minimum 30 inches of width and 21 inches of clearance in front per International Residential Code (IRC) guidelines, though local codes may vary. Showers require at least 30 x 30 inches of interior space, but 36 x 36 inches feels far less claustrophobic.
Consider a corner layout if you’re working with an irregular or L-shaped room. Placing the toilet or shower in a corner frees up the central floor area and improves traffic flow. Alternatively, a single-wall layout lines all fixtures along one wall, ideal for narrow rooms but requires careful planning to avoid a cramped feel.
If you’re gutting to the studs, consult a licensed plumber before relocating drains. Moving a toilet drain more than a few feet often means breaking into the subfloor and can quickly inflate costs. Sometimes the most cost-effective design keeps plumbing where it already lives.
Space-Saving Fixtures and Fittings That Make a Big Impact
Fixture selection is where small bathrooms succeed or fail. Standard vanities run 24 inches deep, but compact models at 18 inches or even 16 inches reclaim precious walking space without losing much function. Look for pedestal sinks or wall-hung sinks if you can sacrifice under-sink storage, they open up floor area and make the room feel less crowded.
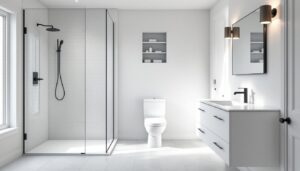
Toilets matter more than most people think. A standard round-front bowl projects about 28 inches from the wall: an elongated bowl adds another two inches. In tight quarters, stick with round-front or consider a compact elongated model that splits the difference. Wall-hung (wall-mounted) toilets hide the tank inside the wall, shaving off several inches and simplifying floor cleaning, though installation requires opening walls and costs more upfront.
For showers, ditch the swinging door. A sliding barn-style door or frameless glass panel (with no door at all) eliminates door swing and keeps sightlines open. Curved shower rods add elbow room inside a tub/shower combo without any construction. If you’re building from scratch, a curbless (barrier-free) shower with a linear drain creates a seamless look and maximizes perceived space.
Wall-Mounted Vanities and Floating Storage Solutions
Wall-mounted vanities are the MVP of small bathroom design. By lifting the cabinet off the floor, they expose more tile or flooring, tricking the eye into seeing a larger room. They also simplify cleaning, no baseboards or toe kicks to work around.
When selecting a floating vanity, ensure it’s anchored into solid blocking between studs, not just drywall. Use at least two 3-inch screws into each stud or install a continuous 2×6 or 2×8 backer board behind the drywall during framing. A poorly secured vanity will sag or pull free, especially once loaded with toiletries.
Pair the vanity with floating shelves or a recessed medicine cabinet. Recessed cabinets sit between studs (typically 14.5 inches wide between framing) and add storage without protruding into the room. If you hit a stud where you want the cabinet, a surface-mount model works, but try to keep it shallow, 4 inches or less, to avoid head bumps.
Color and Light Strategies to Visually Expand Your Bathroom
Paint does heavy lifting in small spaces. Light, cool tones, soft whites, pale grays, barely-there blues, reflect more light and push walls visually outward. That doesn’t mean sterile: warm whites and off-whites (with a hint of cream or beige) add warmth without closing in the space.
Go semi-gloss or satin on walls. The slight sheen bounces light better than flat paint and stands up to moisture. For ceilings, many designers advocate for the same wall color carried overhead to blur boundaries and eliminate the box effect. High-gloss ceilings can work too, though they highlight every imperfection in the drywall.
Lighting is non-negotiable. A single overhead fixture leaves shadows and flattens the room. Layer lighting instead: recessed ceiling cans (4-inch trims work well in low ceilings) for general illumination, sconces flanking the mirror at eye level for task lighting, and even LED strip lighting under floating vanities or inside niches. Aim for 75–100 lumens per square foot in a bathroom, it’s a task-heavy space.
Mirrors multiply light and depth. A full-wall mirror above the vanity is the easiest win, but even a large framed mirror (36 inches wide or more) makes a difference. Position mirrors to reflect windows or light sources, not dark corners. If privacy allows, leave windows undressed or use sheer cellular shades that let light through without exposure.
Smart Storage Solutions for Compact Bathrooms
Storage in a small bathroom is about using vertical space and dead zones. Start with recessed niches in the shower, cut into the wall between studs (again, typically 14.5 inches wide) and tile the interior. A niche at chest height keeps shampoo within reach without cluttering the tub deck.
Above the toilet, install a floating shelf or a shallow cabinet. This dead space often goes unused but can hold extra towels, toilet paper, or baskets for small items. Keep it shallow (8–10 inches) to avoid crowding the toilet.
Over-the-door hooks and towel bars mounted on the back of the door recover otherwise wasted real estate. Magnetic or adhesive organizers inside cabinet doors hold hair tools, makeup, or cleaning supplies. If you have a pedestal sink, a sink skirt with pockets or a narrow rolling cart that tucks beside the vanity can add concealed storage.
For families, consider drawer organizers and tiered trays inside vanity drawers. A single deep drawer can hold far more than a cabinet with a fixed shelf if it’s divided properly. The same organizing principles from storage-focused bedroom solutions apply here, vertical dividers, stackable bins, and designated zones keep chaos in check.
Tile and Flooring Choices That Enhance Small Spaces
Tile selection affects perceived size more than most DIYers expect. Large-format tiles, 12×24 inches or bigger, minimize grout lines and create a cleaner, more expansive look. Fewer grout lines mean less visual clutter and easier cleaning. Run floor tiles diagonally to stretch sightlines, or use a horizontal stacked pattern (rather than offset brick) on walls to widen the space visually.
Light-colored tile in matte or honed finishes (not high-gloss, which shows every water spot) keeps things airy. Glossy wall tile can work as an accent but can feel busy if overused. For floors, consider porcelain that mimics natural stone or wood, it’s durable, water-resistant, and comes in realistic textures. Actual wood or luxury vinyl plank (LVP) can work if rated for wet areas, but porcelain is more foolproof.
Carrying the same floor tile into the shower eliminates visual breaks and makes the room feel continuous. If using different materials, try to keep the color palette tight, variations in tone fragment the space. According to renovation showcases on platforms like Remodelista, monochromatic tile schemes deliver the most expansive feel in compact footprints.
For walls, subway tile remains a solid choice, classic, affordable, and easy to install. A vertical stack or herringbone pattern adds interest without overwhelming. If going bold with color or pattern, limit it to one accent wall (typically behind the vanity or in the shower) and keep the rest neutral.
Budget-Friendly Design Tricks for Small Bathroom Renovations
Small bathrooms offer a rare advantage: less square footage means material costs stay lower. A gallon of quality paint covers about 350–400 square feet, so one gallon often handles walls and ceiling. Tile quantities are manageable, and fixture upgrades won’t expensive if chosen carefully.
Refresh rather than replace when possible. If the existing vanity is solid but dated, paint it with a durable cabinet enamel or chalk paint sealed with polyurethane, then swap the hardware and countertop. A remnant slab of quartz or butcher block often costs a fraction of a full slab and works perfectly for a small vanity.
Re-glaze the tub instead of replacing it. Professional reglazing (also called refinishing) runs a few hundred dollars and can extend the life of a cast-iron or steel tub by years. DIY kits exist but require excellent ventilation and careful surface prep, skip this unless you’re confident with chemical coatings.
Peel-and-stick options have improved dramatically. Peel-and-stick vinyl tile (not the flimsy stuff from the ’90s) and even peel-and-stick mosaic sheets can cover old tile or drywall for a temporary or rental-friendly update. They won’t hold up as long as traditional tile, but in a low-traffic powder room, they’re a viable budget move.
Source fixtures from discount retailers, habitat resale stores, or online marketplaces. A lightly used pedestal sink or a wall-mounted faucet from a canceled remodel can save hundreds. For design inspiration and budget makeover ideas, browsing galleries on sites like Apartment Therapy or visual platforms such as Homify can spark creative, cost-effective solutions.
Finally, DIY what you can, but know your limits. Painting, installing shelves, swapping fixtures, and tiling a backsplash are all manageable for a confident DIYer with the right tools (wet saw, level, notched trowel). Moving plumbing, electrical work beyond swapping a light fixture, or structural changes (removing walls, relocating drains) require licensed pros and often permits. Skipping permits on work that requires them can complicate home sales and void insurance claims.