Nordic kitchen design isn’t just an aesthetic, it’s a practical approach to creating bright, uncluttered spaces that actually work for daily life. Rooted in Scandinavian principles of functionality and natural beauty, this style prioritizes clean lines, honest materials, and abundant light. Unlike trend-chasing kitchen makeovers, the Nordic approach builds on timeless elements that stand up to real use. Whether you’re planning a full remodel or refreshing what you’ve got, understanding these core principles helps DIYers make smart choices with cabinets, finishes, and layouts that won’t feel dated in five years.
Table of Contents
ToggleKey Takeaways
- Nordic kitchen design prioritizes function over ornamentation, using clean lines, natural light, and honest materials like light wood and matte finishes to create timeless, low-maintenance spaces.
- Essential elements include light woods (birch, oak, or pine), neutral color palettes with warm whites and grays, and minimalist backsplashes—with white subway tile or large-format porcelain being the standard choices.
- Optimize workflow by following the work triangle principle (refrigerator, sink, cooktop positioned 4–9 feet apart), frameless cabinets, and handleless or recessed-pull hardware to maintain clean, seamless aesthetics.
- Layer lighting across three types—ambient (recessed LEDs at 3000K–3500K), task (LED strip lights under cabinets), and accent (simple pendant lights)—to compensate for natural light variations inspired by Scandinavian design traditions.
- Transform your kitchen affordably under $500 by painting cabinets, swapping hardware, replacing fixtures, converting to open shelving, and decluttering countertops—proving Nordic kitchen design doesn’t require a full remodel budget.
What Is Nordic Kitchen Design?
Nordic kitchen design draws from the design traditions of Denmark, Sweden, Norway, Finland, and Iceland. It emerged from geographic necessity: long, dark winters and limited daylight shaped a style that maximizes natural light and creates warmth through simplicity.
At its core, this approach values function over ornamentation. Cabinets lack decorative molding. Hardware stays minimal or disappears entirely with push-to-open mechanisms. Counters remain clear because ample storage keeps small appliances and clutter out of sight.
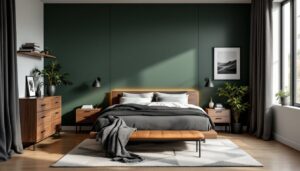
The style emphasizes natural materials in their honest state, light woods like birch, ash, and pine appear with clear finishes that show grain. Stone countertops, linen textiles, and matte metals complement rather than compete. Color palettes stay neutral: whites, grays, and soft earth tones dominate, with occasional muted blues or greens.
Unlike stark minimalism, Nordic design includes warmth through texture and tactile materials. It’s not about empty rooms, it’s about intentional choices. Every element serves a purpose, and quality beats quantity. This philosophy makes it surprisingly DIY-friendly: fewer elements mean fewer opportunities for mismatched finishes or overcomplicated installations.
Essential Elements of a Nordic Kitchen
Getting the Nordic look right means understanding the non-negotiables. Two elements anchor the entire style.
Light Wood and Natural Materials
Light wood dominates Nordic kitchens, but not all light woods work the same. Birch offers tight, even grain and takes stain well if you want subtle color shifts. White oak (actual dimension after milling: 3/4″ thick for standard cabinet-grade material) provides more pronounced grain and better durability for high-traffic areas. Pine costs less but dents easier, fine for upper cabinets, questionable for lower ones that take abuse.
When selecting materials for cabinet transformations, stick with matte or satin finishes. High-gloss polyurethane reads too formal. Natural oils like Rubio Monocoat or Osmo maintain the wood’s tactile quality while providing protection. Plan on two coats minimum, with light sanding (220-grit) between applications.
For countertops, white or light gray quartz handles daily use better than marble (which stains and etches) while maintaining the clean aesthetic. Butcher block adds warmth but requires monthly oiling and careful water management. Thickness matters: standard countertop material runs 3cm (approximately 1-1/4″), but 2cm works for budget builds if properly supported with plywood substrate.
Backsplashes should recede, not demand attention. White subway tile (3″ × 6″ is standard) with tight gray grout lines stays classic. Large-format porcelain slabs (12″ × 24″ or bigger) reduce grout lines further and speed installation. Skip busy patterns, metallics, or anything trending hard on social media right now.
Minimalist Color Palettes
Nordic color schemes follow a predictable formula: white as the base, with grays and natural wood tones as secondaries. But pure white (#FFFFFF) often feels cold and clinical. Better choices include warm whites with slight cream or gray undertones.
For walls and cabinets, Benjamin Moore’s Simply White (OC-117) or Sherwin-Williams’ Alabaster (SW 7008) provide warmth without reading yellow. These work across different lighting conditions, crucial since Nordic kitchens rely heavily on natural light that shifts throughout the day.
Gray appears in hardware, faucets, and accent pieces. Matte black or brushed stainless hardware suits the aesthetic, though true black can feel harsh. Consider softer options like graphite or pewter for cabinet pulls and knobs. Avoid antique bronze or brass, those read too traditional.
If you’re adding color, keep it muted. Sage green, soft gray-blue, or warm taupe work on a single accent wall or open shelving. Never more than one accent color, and it should appear in at least three places in the room to feel intentional rather than random.
Wood tones should stay consistent across the space. Mixing a blonde birch table with medium oak cabinets creates visual static. If you’re working with existing wood elements you can’t replace, bridging disparate finishes takes careful planning with transitional pieces.
How to Create a Functional Nordic Kitchen Layout
Nordic kitchens prioritize workflow efficiency using the classic work triangle: refrigerator, sink, and cooktop should form a triangle with legs between 4 and 9 feet each. This isn’t just theory, it’s codified in kitchen design standards that reduce unnecessary steps during meal prep.
Open shelving appears in most Nordic kitchens, but it’s polarizing among DIYers. It keeps frequently used items accessible and adds visual lightness. But, it demands discipline, unmatched dishes and clutter destroy the look instantly. If you’re installing open shelves, use 3/4″ solid wood or plywood (actual thickness) with supports every 32 inches maximum to prevent sagging. Brackets should mount into wall studs or use appropriate anchors rated for the load.
For closed cabinets, frameless (European-style) construction gives the clean, seamless look that defines the style. Doors mount directly to the cabinet box without a face frame, maximizing interior space. If you’re refacing existing framed cabinets, this presents a challenge, you can’t easily convert between the two systems without replacing boxes entirely.
Handleless cabinets with push-to-open hardware or recessed pulls maintain clean lines. Push-to-open mechanisms (like Blum Tip-On) cost roughly $8–15 per door but fail more often than traditional pulls, keep that in mind for heavy or frequently opened cabinets. Recessed pulls (sometimes called “finger pulls”) routed into door edges offer durability but complicate DIY door construction unless you’ve got a router table and solid technique.
Countertop depth stays standard at 25 inches from the wall to the counter edge (with cabinets at 24 inches deep to allow overhang). Don’t deviate without good reason, non-standard dimensions complicate future replacements and look off when paired with standard appliances.
Keep the island simple if you’re adding one. Waterfall edges (where countertop material continues down the sides) look striking but double your stone costs and require perfect miter cuts, not a beginner DIY task. A simpler approach: standard overhang with seating on one side. Allow 15 inches of depth and 24 inches of width per seat minimum for comfortable use.
Choosing the Right Lighting for Your Scandinavian Kitchen
Lighting makes or breaks Nordic design. Those long Scandinavian winters pushed designers to master artificial light that mimics natural daylight.
Layer your lighting across three types: ambient (general overhead), task (focused on work surfaces), and accent (highlighting specific features). All three need careful planning during the rough-in phase, running new circuits after drywall goes up costs significantly more.
For ambient lighting, recessed LED fixtures (4-inch or 6-inch) provide even, shadow-free light. Space them roughly 4 to 6 feet apart in a grid pattern. Choose a color temperature between 3000K and 3500K, warmer than office lighting (4000K+), cooler than vintage incandescents (2700K). This range complements white walls and light wood without adding yellow or blue casts.
Avoid can lights (the older recessed fixture style) if you’re starting fresh. Modern slim LED retrofit fixtures install in a 4-inch ceiling hole and provide better light distribution with less energy use. They’re also easier for DIYers to install since they don’t require deep ceiling cavities.
Pendant lights over islands or dining areas add sculptural interest without fussy detail. Choose simple geometric shapes in matte black, white, or natural materials like wood or linen. Hang pendants 30 to 36 inches above counter height, low enough to light the surface, high enough to avoid head-bumps. Wire them on dimmers for flexibility.
Under-cabinet task lighting should use LED strip lights rather than puck lights, which create distracting hot spots. Install strips toward the front edge of cabinets, hidden behind a small trim piece if visible from seating areas. Hardwired installations look cleaner than plug-in options, but the latter work fine if you’re avoiding electrical work. Choose strips rated for at least 300 lumens per foot for adequate task lighting.
Maximize natural light aggressively. Insights from Scandinavian design principles emphasize keeping windows unobstructed and using sheer or no window treatments. If privacy isn’t an issue, skip curtains entirely. When it is, top-down bottom-up shades let light in while blocking sightlines, particularly useful for kitchens facing neighboring homes.
Budget-Friendly Ways to Achieve the Nordic Look
Full kitchen remodels average $25,000 to $50,000 nationally (as of 2026), depending on materials and labor. You don’t need that budget to shift toward Nordic style.
Start with paint. A gallon covers roughly 350 to 400 square feet with proper surface prep. Painting existing cabinets transforms a kitchen for under $200 in materials. Clean thoroughly with TSP substitute, sand with 150-grit, prime with a bonding primer like Zinsser BIN or Sherwin-Williams Extreme Bond, then apply two coats of a durable cabinet paint. Use a foam roller for flat surfaces and a quality brush (Purdy or Wooster) for edges and details. Budget three full days: one for prep and prime, two more for paint coats with drying time.
Swap hardware for matte black or brushed nickel pulls and knobs. Decent options run $2 to $6 per piece online. Most cabinet doors use 3-inch or 4-inch center-to-center spacing for pulls, measure existing holes before ordering. Filling old holes and drilling new ones is straightforward with a drill/driver and a 3/16″ bit. Use a template (a scrap piece of cardboard with marked holes) to keep spacing consistent across all doors.
Replace dated light fixtures with simple, budget-friendly alternatives. Resources for kitchen lighting options at Homedit showcase how big-box stores carry acceptable Nordic-style pendants for $30 to $80 each. Install them yourself if you’re comfortable with basic electrical work, shut off the breaker, test with a non-contact voltage tester, and follow manufacturer instructions. If you’re unsure, hire an electrician for a one-hour service call.
Open shelving costs less than cabinets. Remove upper cabinet doors (save them in case you change your mind) or demo a section of uppers entirely. Install solid wood shelves on heavy-duty brackets. Expect to spend $15 to $30 per linear foot for decent wood shelving and brackets. Paint or stain to match your desired finish.
Countertop paint kits (like Giani or Rust-Oleum) mimic stone for $70 to $100 per kit, covering roughly 35 square feet. Results vary, it’s a Band-Aid, not a permanent fix, but it buys time while you save for real stone or quartz. Surface prep is critical: degrease, sand, and follow application instructions exactly. These finishes aren’t as durable as real countertops, so expect to replace them in three to five years.
DIYers sometimes overlook the power of decluttering and editing. Nordic style demands restraint. Remove countertop appliances, excess decor, and anything that doesn’t serve daily function. Store small appliances in lower cabinets with outlets inside (an increasingly common upgrade) so counters stay clear. This costs nothing and has immediate visual impact.