Designing an ADA-compliant bathroom isn’t just about checking regulatory boxes, it’s about creating a space that’s genuinely usable for people with varying mobility needs while maintaining style and function. Whether homeowners are planning for aging in place, accommodating a family member with disabilities, or adding long-term value to their property, understanding accessibility standards makes the project go smoother. The 2010 ADA Standards for Accessible Design (revised through 2026) set clear benchmarks for commercial spaces, and while residential bathrooms aren’t legally required to meet these specs, following them creates safer, more versatile spaces that can serve anyone who uses the home.
Table of Contents
ToggleKey Takeaways
- ADA bathroom design prioritizes maneuvering space, fixture height, and grab bar placement to accommodate wheelchairs and people with limited mobility while maintaining style and functionality.
- Essential dimensions include a minimum 32-inch door opening, 30×48-inch clear floor spaces at fixtures, accessible sinks with 34-inch rim height, and either a 60-inch turning radius circle or T-shaped turning space for wheelchair users.
- Curbless showers with linear drains, comfort-height toilets (17-19 inches), wall-mounted lever faucets operable with one hand, and grab bars anchored into solid blocking are critical ADA bathroom fixtures for safety and accessibility.
- Accessible bathrooms can achieve upscale aesthetics through designer grab bars in oil-rubbed bronze or matte black, floating vanities with recessed fronts, large-format tile, and proper lighting and color contrast that don’t compromise style.
- While full ADA compliance may face practical challenges in residential settings, incorporating as many accessible elements as feasible significantly improves safety and adds long-term property value.
- Bathroom remodels involving plumbing relocation or structural changes require permits and licensed professionals, though surface-level accessibility improvements like grab bar installation can be DIY projects with proper anchoring hardware.
Understanding ADA Bathroom Requirements and Why They Matter
The Americans with Disabilities Act (ADA) establishes minimum standards for public and commercial bathroom accessibility, but these guidelines offer excellent blueprints for residential projects too. The core principle: fixtures and features should be reachable and usable by someone in a wheelchair without assistance.
Key requirements focus on three areas: maneuvering space, fixture height and placement, and grab bar installation. Commercial facilities must comply by law, but homeowners benefit from voluntarily adopting these standards. A bathroom designed to ADA specs accommodates wheelchairs, walkers, and people with limited mobility, making it safer for elderly residents, anyone recovering from surgery, and guests with disabilities.
It’s worth noting that full ADA compliance in a residential setting may not always be practical due to existing structural constraints or space limitations. But, incorporating as many elements as feasible improves accessibility significantly. Some jurisdictions offer tax credits or rebates for accessibility improvements: check with local building departments before starting the project.
For homeowners planning renovations, this isn’t necessarily a DIY project. Bathroom remodels involving plumbing relocation, wall removal, or structural changes typically require permits and may need licensed plumbers and electricians. Surface-level changes like grab bar installation can be tackled by confident DIYers with the right anchoring hardware.
Essential Dimensions and Clearances for ADA-Compliant Bathrooms
Getting the measurements right is non-negotiable in accessible design. ADA standards specify exact dimensions for clear floor space, door widths, and fixture placement, and these numbers directly impact usability.
Door width must provide at least 32 inches of clear opening when the door is open at 90 degrees (a 36-inch door typically achieves this). Pocket doors or outswing doors work better than inswing models, which eat up precious maneuvering room inside the bathroom. Lever-style handles are required instead of knobs, as they’re operable with a closed fist or elbow.
Clear floor space in front of each fixture must measure at least 30 inches by 48 inches, enough room for a wheelchair to approach. These spaces can overlap (the same floor area can serve the toilet and sink if positioned correctly), but they cannot be obstructed by doors, vanities, or other fixtures.
Counter height matters, too. Accessible sinks should have a rim height no higher than 34 inches from the floor, with knee clearance underneath measuring at least 27 inches high, 30 inches wide, and 19 inches deep. This lets someone in a wheelchair roll up close. Wall-mounted or pedestal sinks work better than vanity cabinets for this reason, though some homeowners opt for custom vanities with recessed fronts.
Turning Radius and Floor Space Requirements
The turning radius is perhaps the most challenging dimension to achieve in smaller bathrooms. ADA standards call for either a 60-inch diameter circle for a full turn, or a T-shaped turning space with a 36-inch-wide top and 60-inch-long stem. This allows wheelchair users to change direction without backing up.
In tight residential bathrooms, the T-turn often proves more adaptable. It can extend into an adjoining hallway if the door opens outward, or it can overlap with required clear floor spaces at fixtures. Measure carefully during the planning phase, this is where many retrofits hit a wall, literally.
If the existing bathroom can’t accommodate a full turning radius without major structural work (removing a load-bearing wall, for instance), consult a structural engineer before proceeding. Some homeowners find that expanding into an adjacent closet or hallway offers a more cost-effective solution than a full addition. Exploring bathroom design trends can also spark creative layout ideas that balance accessibility with aesthetics.
Choosing and Installing ADA-Compliant Fixtures
Fixture selection goes beyond picking pretty faucets. ADA-compliant models have specific operating mechanisms, mounting heights, and clearance requirements that affect both installation and daily use.
Faucets must be operable with one hand without tight grasping, pinching, or wrist twisting. Lever handles, push-button controls, and touchless sensors all qualify. Avoid traditional cross handles or knobs. The maximum force required to operate should be 5 pounds, though most modern lever faucets easily meet this.
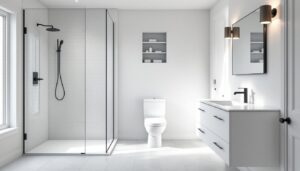
Showers require a 60-inch by 30-inch clear interior space (or a 36-inch by 36-inch stall with specific seat placement). A barrier-free, curbless shower with a linear drain eliminates the tripping hazard of a threshold and allows wheelchair roll-in access. This requires careful floor pitch (typically 1/4 inch per foot toward the drain) and waterproofing, not a beginner DIY project. Hire an experienced tile setter or bathroom contractor for curbless installations.
Shower controls should be mounted 38 to 48 inches above the floor and operable from both inside and outside the spray zone. Handheld showerheads with slide bars offer the most flexibility, allowing users to adjust height or hold the spray as needed.
Toilets, Sinks, and Grab Bar Placement
Toilet height is critical. Standard toilets sit 15 to 17 inches from floor to seat, but ADA-compliant models (often called “comfort height” or “right height”) measure 17 to 19 inches, the same height as a standard chair, which makes sitting and standing easier. Brands like Kohler, TOTO, and American Standard offer models explicitly labeled ADA-compliant.
The toilet’s centerline must be 16 to 18 inches from the side wall. Clear floor space of at least 60 inches (from the side wall) by 56 inches (from the rear wall) is required to allow wheelchair transfer. This is wider than most traditional powder rooms.
Grab bars are non-negotiable for safety and must be anchored into solid blocking, not drywall. Install 1.5-inch diameter bars (they’re easier to grip than thinner towel bars) capable of supporting 250 pounds of force. Behind the toilet, mount a horizontal bar 33 to 36 inches above the floor, spanning at least 42 inches. One vertical grab bar on the side wall helps with transfers.
In showers, install grab bars on the control wall and the back wall at 33 to 36 inches high. Use stainless steel or textured finishes that provide grip even when wet. For retrofit installations, locate studs with a stud finder and use 3-inch stainless screws into solid lumber (2×6 or 2×8 blocking is ideal). If studs aren’t positioned correctly, open the wall, add blocking between studs, and patch, it’s worth the effort for safety. Platforms like Houzz showcase real-world examples of grab bar installations that blend function with design.
Wall-mounted sinks need knee clearance and should be paired with insulated or covered drain pipes to prevent leg burns. Install the sink so the rim is no higher than 34 inches and the drain is at least 27 inches above the finished floor. P-traps should be as far back as plumbing allows to maximize leg room.
Design Tips for Combining Accessibility with Aesthetic Appeal
Accessible design doesn’t have to look clinical. With thoughtful material and fixture choices, an ADA-compliant bathroom can rival any design featured on Remodelista or in upscale home magazines.
Curbless showers are both accessible and trendy. Pair a linear drain with large-format porcelain tile (12×24 or larger) to minimize grout lines and create a sleek, spa-like look. Use the same tile on the shower floor and surrounding bathroom floor for visual continuity, just ensure the shower floor has slip-resistant texture (look for a DCOF rating of 0.42 or higher for wet areas).
Floating vanities with recessed fronts offer wheelchair clearance while maintaining modern aesthetics. Choose a wall-mounted cabinet in a wood tone or matte finish, and pair it with a sleek vessel or undermount sink. Leave the area beneath open, or add a removable panel if the look of exposed plumbing bothers the homeowner.
Grab bars no longer mean institutional chrome. Manufacturers now offer designer grab bars in oil-rubbed bronze, matte black, brushed nickel, and even custom colors. Some integrate with towel bars or shelving, making them less obvious. Moen, Delta, and Kohler all have stylish accessible lines. The key is matching finish across all fixtures, faucets, bars, showerheads, and cabinet hardware, for a cohesive look.
Lighting plays a double role: it enhances safety and sets the mood. Install bright, even overhead lighting (LED recessed cans or flush-mount fixtures rated for damp locations) to eliminate shadows that make navigation harder for people with low vision. Add sconces flanking the mirror at eye level for task lighting. Dimmer switches let users adjust brightness, and motion-sensor lights near the toilet or entry prevent fumbling for switches at night.
Color contrast improves visibility for people with vision impairments. A dark vanity against light walls, or a contrasting toilet seat, makes fixtures easier to locate. This doesn’t mean sacrificing style, monochromatic schemes work fine as long as there’s tonal variation.
Flooring should be slip-resistant but not institutional. Textured porcelain tile, luxury vinyl plank (LVP) with embossed surfaces, or even cork (with proper sealing) all work. Avoid high-gloss finishes and natural stone without honed or textured surfaces. Keep transitions between flooring materials flush or use low-profile thresholds (maximum 1/2 inch tall, beveled) to prevent tripping.
Finally, consider the little details: a handheld showerhead on a slide bar doubles as a stylish design element: a teak shower bench adds warmth and can match other wood accents: open shelving keeps towels and toiletries within easy reach without upper cabinets. Sites like Homify offer thousands of accessible bathroom photos that prove universal design can look high-end.
Conclusion
An accessible bathroom is an investment in long-term usability, safety, and home value. By following ADA guidelines, proper clearances, compliant fixture heights, and robust grab bar installation, homeowners create spaces that work for everyone, regardless of age or mobility. And with today’s range of stylish accessible products, there’s no reason function and beauty can’t coexist in the same well-designed room.